Part 3 on How to Create a Web site with Photoshop and Dreamweaver
This tutorial is part of a 4 page tutorial on how to create a simple web site using Photoshop.
Tutorial 1 : Creating a unique website header
Tutorial 2 : Designing your website layout in Photoshop
Tutorial 3 : Slicing your layout in Photoshop
Tutorial 4 : Creating your web site in Dreamweaver
Let us begin with the slicing tutorial. We need to slice the layout to save the necessay images in web format and use them in html. Click here to view the layout we are using on our 4 part tutorial on creating a website. Follow these steps to slice your layout.
- Open the file you want to slice clicking on File>Open. You can open the above layout.
Important : You have to organize your layout in such a way that you should be able to put them into rows and columns in a table in Dreamweaver.
You can write down how you are going to slice your layout to get the idea. Anything that is text and backround colors can be done easily in Dreamweaver. Only images and graphis have to be sliced in Photoshop. - Here we will slice only 3 images i.e. the logo, banner and the graphics on the right. Now you can start to slice your layout. Select the
 slice tool and draw a box to define the area you want to slice. We will first create a slice for the logo. Next, use the slice tool again to drag across the banner and create the next slice. Repeat for the graphics found on the right with the dotted line. Create one slice for all the 3 images. View the completed layout to check the slices.
 - Next, we will name the slices. Go to the slice tool in the menu palette and select the Slice Select Tool. Now double click on the slice. A screen named Slice Options will come. Enter the type of the slice, as an image and name of the slice. For the logo slice, give the name logo. Repeat this step to name the banner slice and the graphics slice. You can name them banner and pic_right.
- Go to File > Save for web. A screen named Save for web will come. Select the logo slice and choose gif from the drop down menu. next, select the banner and pic_right slices and select JPEG and maximum from the drop-down menus.
Tip : Remember photographs should always be exported as JPEG and solid colors can be exported in .GIF formats Adaptive Colors 256. - Now the slices are ready to be exported. Select the 3 sliced images in the save for web pop-up box by using the shift key. Click on Save.
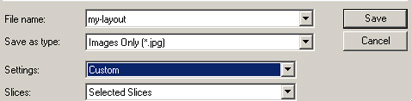
- A screen named Saved Optimized As will appear. Save your slices in your website folder. Make sure your image file is in the same path as your work file. Choose the following options for the rest of the options:
Save as type: Choose Images Only
Slices: Choose selected slices.
Now click on Save. Check that the 3 images have been saved in the images folder in your web site folder. Proceed to creating the website in Dreamweaver.
This tutorial is part of a 4 page tutorial on how to create a simple website using Photoshop.
Tutorial 1 : Creating a unique website header
Tutorial 2 : Designing your website layout in Photoshop
Tutorial 3 : Slicing your layout in Photoshop
Tutorial 4 : Creating your web site in Dreamweaver
No portion of these materials may be reproduced in any manner whatsoever, without the express written consent of Entheos. Any unauthorized use, sharing, reproduction or distribution of these materials by any means, electronic, mechanical, or otherwise is strictly prohibited.
Photoshop Tutorials & Resources
Related Posts