This tutorial teaches you how to create a 3D ball in a few simple steps using Photoshop CS.
Step 1
Open your canvas. Press D. (to set default foreground and background colors) Press Alt+Backspace to fill the canvas with black color. Create a new layer by clicking on the ![]() ‘Create a new layer‘ icon at the bottom of the layers panel.
‘Create a new layer‘ icon at the bottom of the layers panel.
Step 2
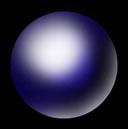
Select the Elliptical marquee tool![]() from the toolbar, with the shift key down draw a circle on the canvas. The circle is marked with a dashed line.
from the toolbar, with the shift key down draw a circle on the canvas. The circle is marked with a dashed line.
Step 3
Click on the black foreground color ![]() on the toolbar and select your favorite color, I selected blue. Now press Alt+Backspace, the circle is shaded with the color now.
on the toolbar and select your favorite color, I selected blue. Now press Alt+Backspace, the circle is shaded with the color now.
Step 4
Create another new layer the same way how you did in the first step.
Step 5
Now we’ll use the airbrush to give some shading. Click on the brush tool ![]() on the toolbar. Just below the main menu you’ll see the brush settings. Give the settings as in the image below.
on the toolbar. Just below the main menu you’ll see the brush settings. Give the settings as in the image below. Press D to make the foreground color to black. With the brush paint gently around the ball, keep the position of the brush as seen in the image on the right.
Step 6
Create a new layer. Press x to set the foreground color to white. With the same sized brush paint the edge as seen in the image below and also shade the top of the ball.
No portion of these materials may be reproduced in any manner whatsoever, without the express written consent of Entheos. Any unauthorized use, sharing, reproduction or distribution of these materials by any means, electronic, mechanical, or otherwise is strictly prohibited.
3D Modeling Tutorials:
Maya Tutorials:
Blender Tutorials:
Game Art and Design