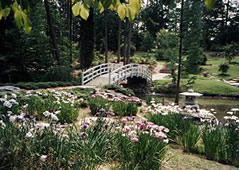
Using the Lens Effect in Photoshop CS you can give a lot of lighting effects to your images. Try this tutorial to add sunrays to a picture like this!
Step 1
Open a picture to which you want to add sunrays. I’ve chosen this picture and my objective is to create rays passing in between the trees.
Step 2
Click on Filter>Render>Lens Flare. The Lens Flare window will appear (as in the image below). You can see a + sign which indicates the lens position, now drag the lens on your image and place it wherever you want, change the brightness option to 121% (you can change this according to your image) leave the Lens type as it is (you can experiment on it later with different images) and click OK.

Step 3
Goto the Layers panel, select the layer named ‘background’ and drag it to the fifth icon named ‘Create a new layer’. A duplicate layer will be created now. It will be named ‘background copy’. (You can also change these layer names to suit your work, but for now we’ll leave them with the default names.)
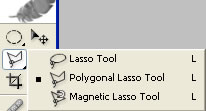
Step 4
Using the polygon lasso tool, draw long triangles that look like rays, starting from the lens.
Step 5
Fill each triangle with white color. If the dotted line still appears on one of your rays press Ctrl+D (to deselect). In the layers panel you will see the Opacity option, move the slider and set to 35%.
Step 6

With the duplicate layer still selected, click on Filter>Blur<Gaussian Blur, this will open up the Gaussian Blur window, and give the radius value to 3 pixels.
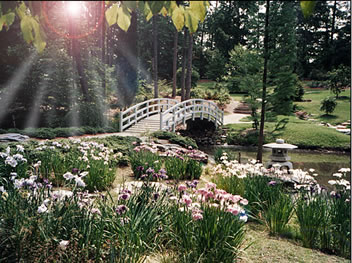
Step 7
This is the final result! Doesn’t it look realistic!
No portion of these materials may be reproduced in any manner whatsoever, without the express written consent of Entheos. Any unauthorized use, sharing, reproduction or distribution of these materials by any means, electronic, mechanical, or otherwise is strictly prohibited.